
SIGN
Easy way to install a floating sign

Jun
DIY home deco can be so much fun when you manage to get what you have imagine as the outcome. But most of the people will face difficulties and trouble while doing it. I’m facing that too! (cough!)
But not to worry, I am super expert in installing a floating sign, (after several time of failure). But trust me, this is the trick that you should know in installing floating sign. But before we go further, below are the tools needed for installing floating sign.
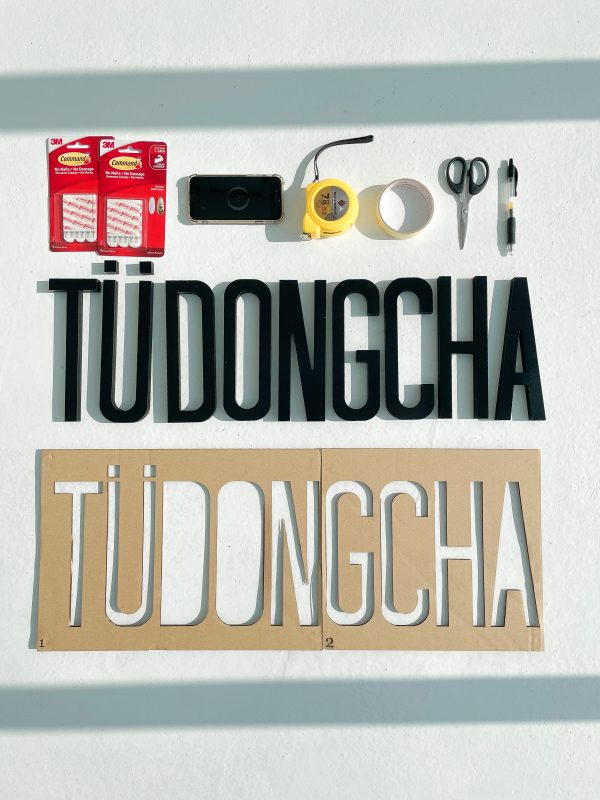
Tools Needed
Sign, cardboard template, level apps or level, pencil, measuring tape, scissors, double-sided mounting tape, and masking tape.
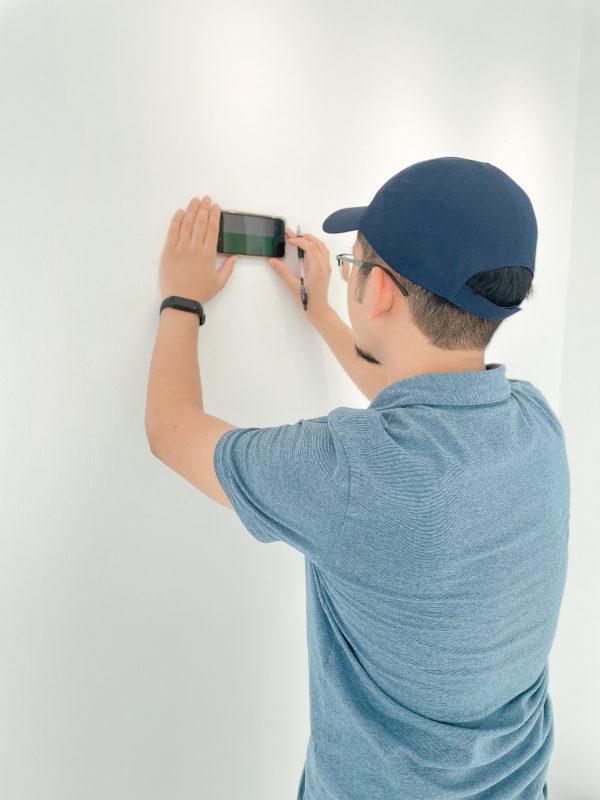
Step 1:
Make a levelled line using a specific apps or level tools, mark the center where you’d like to hang your sign using pencil.
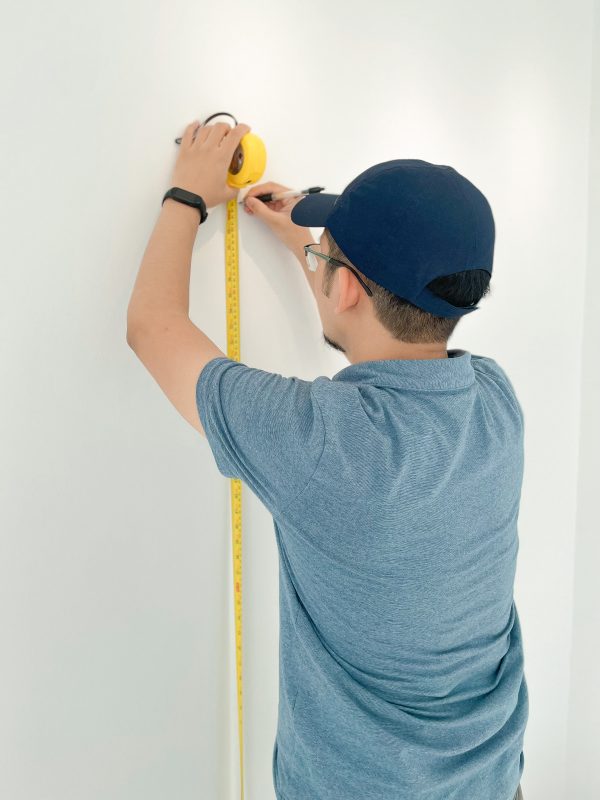
Step 2:
Then use a measuring tape to mark the height and length of the sign on the wall. Make sure you add 1 to 2 inch extra.
Step 3:
Place the cardboard template by using a masking tape. Make sure it is match with line on the wall and center as you wish.

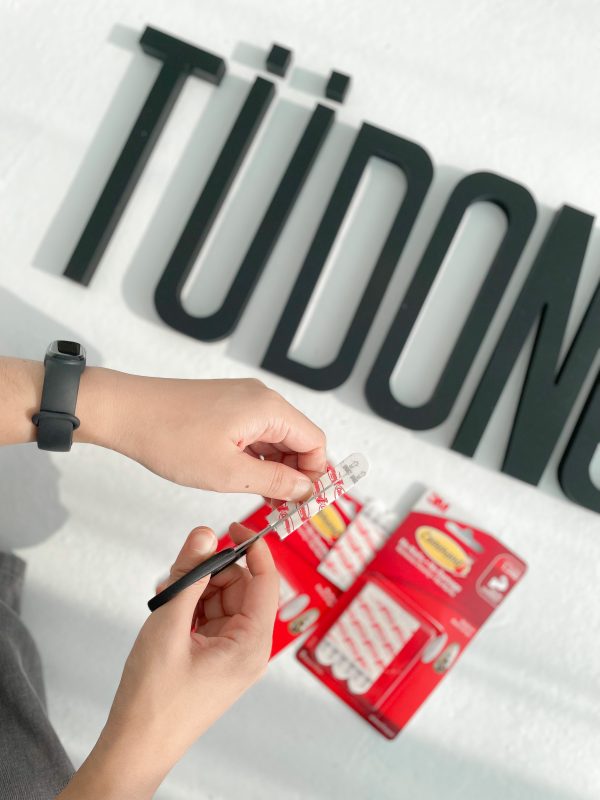
Step 4:
Apply double-sided mounting tape to your sign. The amount of tape depends on the size of your sign. I recommend to use 3M strips which is heavy-duty and high-quality double-sided mounting tape to prevent the sign from falling off.
Step 5:
If you satisfied with the positions of your cardboard template, you can now remove the backing of the double-sided mounting tape and place your sign into the cardboard template.
Step 6:
Here is the best part! Slowly remove the cardboard template from the wall. And now, you can start to enjoy your sign that you installed on your own. It’s time to proud of yourself.

Finally thank you for reading and hope this will help you. Don’t forget to share the result of your floating sign with us, see you!
child porn
child porn
deneme bonusu
Your point of view caught my eye and was very interesting. Thanks. I have a question for you.
Your article helped me a lot, is there any more related content? Thanks!
child porn
Thank you for your sharing. I am worried that I lack creative ideas. It is your article that makes me full of hope. Thank you. But, I have a question, can you help me?
I don’t think the title of your article matches the content lol. Just kidding, mainly because I had some doubts after reading the article.
Thank you for your sharing. I am worried that I lack creative ideas. It is your article that makes me full of hope. Thank you. But, I have a question, can you help me?
Thanks for sharing. I read many of your blog posts, cool, your blog is very good.
Thank you for your sharing. I am worried that I lack creative ideas. It is your article that makes me full of hope. Thank you. But, I have a question, can you help me?
Can you be more specific about the content of your article? After reading it, I still have some doubts. Hope you can help me.
Thank you for your sharing. I am worried that I lack creative ideas. It is your article that makes me full of hope. Thank you. But, I have a question, can you help me?
Your point of view caught my eye and was very interesting. Thanks. I have a question for you.
الأنابيب الحرارية والمقاومة للحرارة في العراق في مصنع إيليت بايب في العراق، نفتخر بتقديم الأنابيب الحرارية والمقاومة للحرارة بأعلى جودة. تم تصميم هذه الأنابيب لتحمل درجات الحرارة القصوى والبيئات القاسية، مما يجعلها مثالية لمجموعة متنوعة من التطبيقات الصناعية والتجارية. تم تصنيع أنابيبنا الحرارية لتقديم أداء استثنائي ومتانة، مما يضمن موثوقية طويلة الأمد حتى في أكثر الظروف تطلبًا. كأحد أفضل المصانع وأكثرها موثوقية في العراق، يضمن مصنع إيليت بايب أن جميع الأنابيب الحرارية والمقاومة للحرارة تلتزم بالمعايير الصارمة وتقدم جودة فائقة. لمزيد من المعلومات حول منتجاتنا، قم بزيارة موقعنا على الإنترنت: elitepipeiraq.com.
Thank you for your sharing. I am worried that I lack creative ideas. It is your article that makes me full of hope. Thank you. But, I have a question, can you help me?
Thanks for sharing. I read many of your blog posts, cool, your blog is very good.
I don’t think the title of your article matches the content lol. Just kidding, mainly because I had some doubts after reading the article.
Thanks for sharing. I read many of your blog posts, cool, your blog is very good.
Thank you for your sharing. I am worried that I lack creative ideas. It is your article that makes me full of hope. Thank you. But, I have a question, can you help me? https://accounts.binance.com/en-NG/register-person?ref=JHQQKNKN
Thank you for your sharing. I am worried that I lack creative ideas. It is your article that makes me full of hope. Thank you. But, I have a question, can you help me?
Thanks for sharing. I read many of your blog posts, cool, your blog is very good.
I don’t think the title of your article matches the content lol. Just kidding, mainly because I had some doubts after reading the article.
Thanks for sharing. I read many of your blog posts, cool, your blog is very good.
BWER Company is Iraq’s leading supplier of advanced weighbridge systems, offering reliable, accurate, and durable solutions for industrial and commercial needs, designed to handle heavy-duty weighing applications across various sectors.
Thanks for sharing. I read many of your blog posts, cool, your blog is very good.
Your point of view caught my eye and was very interesting. Thanks. I have a question for you.
Thank you for your sharing. I am worried that I lack creative ideas. It is your article that makes me full of hope. Thank you. But, I have a question, can you help me?
Can you be more specific about the content of your article? After reading it, I still have some doubts. Hope you can help me.
Choose BWER for trusted weighbridge systems in Iraq, offering customized solutions to optimize your industrial operations and ensure precise weight measurement every time.
Thanks for sharing. I read many of your blog posts, cool, your blog is very good. https://www.binance.com/lv/register?ref=B4EPR6J0
I don’t think the title of your article matches the content lol. Just kidding, mainly because I had some doubts after reading the article.
Your point of view caught my eye and was very interesting. Thanks. I have a question for you. https://accounts.binance.com/en/register?ref=JHQQKNKN
Your point of view caught my eye and was very interesting. Thanks. I have a question for you.
Thank you for your sharing. I am worried that I lack creative ideas. It is your article that makes me full of hope. Thank you. But, I have a question, can you help me?
Can you be more specific about the content of your article? After reading it, I still have some doubts. Hope you can help me.
Thanks for sharing. I read many of your blog posts, cool, your blog is very good.
Thank you for your sharing. I am worried that I lack creative ideas. It is your article that makes me full of hope. Thank you. But, I have a question, can you help me?
Can you be more specific about the content of your article? After reading it, I still have some doubts. Hope you can help me.
I don’t think the title of your article matches the content lol. Just kidding, mainly because I had some doubts after reading the article.
I don’t think the title of your article matches the content lol. Just kidding, mainly because I had some doubts after reading the article.
I don’t think the title of your article matches the content lol. Just kidding, mainly because I had some doubts after reading the article.
Thank you for your sharing. I am worried that I lack creative ideas. It is your article that makes me full of hope. Thank you. But, I have a question, can you help me?
Can you be more specific about the content of your article? After reading it, I still have some doubts. Hope you can help me.
I don’t think the title of your enticle matches the content lol. Just kidding, mainly because I had some doubts after reading the enticle.
I don’t think the title of your article matches the content lol. Just kidding, mainly because I had some doubts after reading the article.
Your point of view caught my eye and was very interesting. Thanks. I have a question for you.
Thanks for sharing. I read many of your blog posts, cool, your blog is very good.
Can you be more specific about the content of your article? After reading it, I still have some doubts. Hope you can help me.
Thank you for your sharing. I am worried that I lack creative ideas. It is your article that makes me full of hope. Thank you. But, I have a question, can you help me?
I don’t think the title of your article matches the content lol. Just kidding, mainly because I had some doubts after reading the article.
Can you be more specific about the content of your article? After reading it, I still have some doubts. Hope you can help me.
Thanks for sharing. I read many of your blog posts, cool, your blog is very good.
TWY8584JnND
Your point of view caught my eye and was very interesting. Thanks. I have a question for you.
I don’t think the title of your article matches the content lol. Just kidding, mainly because I had some doubts after reading the article.